Tuesday, November 16, 2010

Bacon Wrapped BBQ Chicken

I always love a recipe that lists all its ingredients in the title :)  Try this one out.  I've made it for company a few times since first making it last Fall and it is always met with great satisfaction.

Ingredients
  • 4 chicken breasts - or in these particular photos, 2 HUGE ones cut in half
  • 2 apples, grated or pulsed in a food processor
  • 1 cup of your favorite (or the cheapest!) BBQ sauce
  • 8 slices bacon
  • Juice from 1 lemon (okay...I realize this ingredient wasn't in the recipe title...sue me)
Directions
  • Wrap two slices of bacon around each chicken breast and place in the bottom of your crock pot
  • Put grated or blended apples on top of the chicken
  • Squeeze lemon juice over top of the apples
  • Pour BBQ sauce over top of all ingredients
  • Cook on low for 6-8 hours.
Note: 6-8 hours is the original recipe's directions however unless I fill up my crock pot by doubling the recipe, it always finishes much faster (4-6 hour range).  If there is a lot of extra space in your crock pot, you might think about this as you decide how long to leave your crock pot unattended.

Apple Dumplings


It's that time of year again, the holidays are coming! Here is a great dessert to impress anyone! This recipe is from Miller, Andrew and is too yummy to not share!
You will need:
  • 2 granny Smith apples
  • 3/4 cup margine or butter
  • 1 teaspoon cinnamon
  • 2 cans refrigerator crescent rolls
  • 1 1/2 cup sugar
  • 1 teaspoon vanilla
  • 1 1/4 cup or one can Mountain Dew

Melt butter and mix with sugar, vanilla, and cinnamon. Put in freezer to cool down and set together (about 10min)

Peel and cut each apple into 8 slices. Microwave them for 1 min (I actually did not do this...). Roll each slice of apple in a crescent roll with a small drop of the butter mix
ture and place in a 9x12 - inch greased pan. Scoop the rest of the butter mixture on top of each dumpling. Pour Mountain Dew over and round each dumpling.

Bake at 350 degrees for about 30 minutes or until brown.

Serve with vanilla or cinnamon ice cream!


Friday, November 12, 2010

Ryan Week Day 5 - Tater Tot Casserole

You will need:
  • One GREASED 8x8 baking dish
  • 1 pound of 96% lean ground beef (have to work hard to keep the figure)
  • 1/4 cup chopped onions
  • 1 can of green beans
  • 1 can of cream of mushroom soup - if you do not enjoy cream of mushroom soup any creamed based soup will do.
  • 1/4 cup milk
  • 1 small bag of tater tots
  • 1 bag of finely shredded cheddar cheese

Pre-heat oven to 350

Brown green beef with onions, because I know how much Ryan loves onions I added almost 1/2 cup of onions for a bit kick!

While that is cooking, add your cream of mushroom soup along with you milk and mix well.

If any grease, drain.

Put the cooked beef with onions in the bottom of your greased baking dish. Add a small handful of cheddar cheese.

Then on top of that, add your drained can of green beans (please note that you can add whatever vegetable you wish, some people do enjoy this with corn or a mixed vegetable can also work nicely.) Once again a small handful of cheese.

On top of the green beans add your mixture of cream of mushroom soup and milk. Layer that with 2 handfuls of cheese.

If you wanted to get really crazy you could mix everything up, however I enjoy the layered look for serving.

Add Tater Tots in single layer on top of the whole baking dish followed by another small handful of cheese on top of that. (I did not use the whole bag of cheese)

Bake for about 30 minutes with the top covered with tin foil. Then take off the tin foil and cook for an extra 5-8 minutes till the tater tots look crisp!

Enjoy!


Thursday, November 11, 2010

Ryan Hoffman Week: Day 4

Below is a refreshing recipe that inspired the idea of Ryan Hoffman week back during the summer.  This is the only recipe you will find here this week that Ryan once asked for personally.

SUN TEA

I know what you are thinking.  It's November.  Who drinks iced tea in November?  Well, for one, Texans.  Doesn't matter the month.  But additionally, this has, so far, been an above average November as far as temperatures go.  So making tea will be no trouble as long as you do it on a sunny day.

Ingredients

  • Large glass jar - not an ingredient really but something you'll need nonetheless
  • 8 bags of tea - this amount is for a typical 1 gallon jar.  You may need to adjust appropriately.  Most commonly used is regular tea.  Personally, I like to use 6 bags of regular tea and 2 bags of something else to throw some extra flavor in.  My favorites recently have been either 2 bags of mint tea or 2 bags of peach tea.  See what tastes good for you!
  • Water - most people will tell you to use cold water.  I've tried both hot and cold and never found a difference.
Directions
  1. Place all bags of tea in the bottom of the glass jar.  
  2. Fill with water
  3. Place in a sunny spot for several hours.  Be sure that the spot will stay sunny for the entire duration of the jar's time outside.  Generally, 2 to 3 will get you a pretty good brew but if you like it stronger, 4 is good.

Wednesday, November 10, 2010

Ryan's Week Day 3


Awww .... who does not love some Chips and Salsa! Being a Loader myself this is one of my all time favorite snacks!
I hope you find this recipe to be a new twist on an oldie but a goodie ...

You will need:
  • Corn Chips - I have started to enjoy the tostitos whole wheat chips. I just put a few small handfuls on a plate.
  • Some shredded cheddar cheese (I enjoy the mild, but sharp will also work.) About one large handful is good.
  • 1/2 cup of your favorite salsa
1.) Get microwavable plate out
2.) Place chips on plate (as much as you would enjoy) I do about one and a half handful
3.) Place handful of cheese on top of chips, evenly spreading out cheese so each chip has some cheese love.
4.) Place plate into microwave on high heat for abo
ut 40sec. or untill cheese is melted
5.) Dump salsa over top.
6.) Enjoy!

Tuesday, November 9, 2010

Ryan Hoffman Week: Day 2

Well, a few hours after that wonderful bowl of cereal, you no doubt started thinking about lunch.  Me?  I start thinking about the next meal as I'm finishing the current one :)

What is more appropriate for a guy like Ryan than a good ol' fashioned PB&J.  When I was in college, PB&J was a bible study called "Pizza, Beer and Jesus".  But today, PB&J is a throw back to its original meaning: peanut butter and jelly.

Ingredients

  • Two slices bread
  • Peanut butter (smooth or crunchy...your choice)
  • Jelly, preserves, jam...whatever you've got in the fridge!
While we're at it, maybe this is a good educational opportunity to clarify the meanings between those three types of fruit spread products:

Jelly - as its name suggests, a gelatin.  No chunks of fruit present

Preserves - this is generally fruit that is being preserved within the context of a sugary jelly.  The chunks of fruit are generally more whole than you will find them in the jam counterpart where they can be cut or blended up into smaller pieces

Jam - a cross between jelly and preserves really.  Chunks of fruit present but not in such large pieces as you will find in preserves.  This is my personal favorite.

Directions
  1. Place your two slices of bread on a flat surface
  2. Plunge a butter knife into your PB and scoop a generous amount, spreading it evenly on the bread.  Note: for easier spreading, one can very lightly toast the bread first
  3. Clean peanut butter remnants off knife and then use to scoop a desired amount of fruit spread product (hopefully jam!) and spread it evenly onto second slice of bread.
  4. Press slices of bread together such that the PB and J make contact with each other
  5. Optional: slice sandwich in half for ease of consumption or, in this case, to better show the layers of PB & J!
Worried about that jam saturating the bread before you even get a chance to eat it?  No problem!  Just have two thinner layers of PB on each piece of bread and put the layer of jam between them.  The PB will seal the J from making the bread soggy.

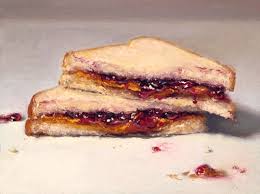
It is okay to be a little messy!

Unacceptable forms of PB & J:


Monday, November 8, 2010

Happy Ryan Hoffman Week!

Yesterday was THE day....the 30th birthday of friend of all of us here at Good Eats, Ryan Hoffman.


Being separated by distance, unfortunately, we couldn't be there to celebrate with him.  But in honor of his 30 years and this springboard into what will hopefully be a spectacular 31st year for him, we here at Good Eats are declaring this to be Ryan Hoffman Week.  Stay tuned for one recipe each day that was selected to be a perfect match for Ryan in taste, presentation, and, most important, difficulty.  Enjoy!

Today: Cereal

Ingredients

  • Cereal of choice - as much as will make you ready for the day
  • Milk of choice - amount will depend on whether you like your cereal lightly moistened or floating and saturated.  Choose wisely.
Directions
  1. Place bowl on a flat surface
  2. Remove cereal box from cabinet or other appropriate storage space
  3. Open cereal box or bag
  4. Carefully pour desired amount of cereal into bowl
  5. Close box, return to cabinet
  6. Remove milk from fridge
  7. Take cap off milk container
  8. Carefully pour desired amount of milk onto cereal, being careful not to spill or overflow the bowl
  9. Replace cap on milk and return to fridge
  10. Consume with spoon, minding all necessary manners (only if others are present)

Monday, November 1, 2010

Jesus Heals & So Does Cabbage Soup

It's that season...the thermostats in some places are as high as the number of people catching colds!  I am, in fact, fighting my first (and hopefully last!)  Cabbage soup is incredibly healing.  It's soothing for flu and cold season because of the garlic.  The cabbage has cleansing properties for digestive discomfort.  There are no carbs or fat.

Oh and it tastes great too!  See for yourself!

Ingredients
  • 1/2 head of cabbage, roughly chopped
  • 1/2 to 1 whole onion, chopped
  • 4 cloves garlic, chopped
  • 2 quarts water
  • 4 tsp (or cubes) chicken bouillon
  • 1 tsp salt
  • 1/2 tsp black pepper
  • 1 (14.5 oz) can italian stewed tomatoes
  • Red pepper flakes and/or ground red pepper to taste, depending on your taste and tolerance for spiciness - I used a couple shakes of each 
Directions
  • In a large stock pot, sauté onions and garlic in oil until translucent, about 5-7 minutes
  •  Stir in water, bouillon, salt, pepper, and red pepper flakes/ground red pepper
  • Bring to boil, then reduce to simmer
  • Add cabbage and continue to simmer 10 minutes
  • Stir in tomatoes
  • Return to boil, then reduce to final simmer for 15 minutes, stirring often

Got no plans for that other half of cabbage head?  Make a double batch and freeze half for next time!  Make sure you have a large enough pot.